In this article, MKT Software will walk you through the steps how to use Page function on MKT Post, a powerful tool for automating Facebook post schedules across pages and boosting engagement. MKT Post is essential for marketers looking to expand their reach, engage audiences efficiently, and maintain a strong social media presence with minimal effort.
Table of Contents
ToggleI. Auto post on Page
Step-by-Step guide for using the auto post on Page wall feature in MKT Post
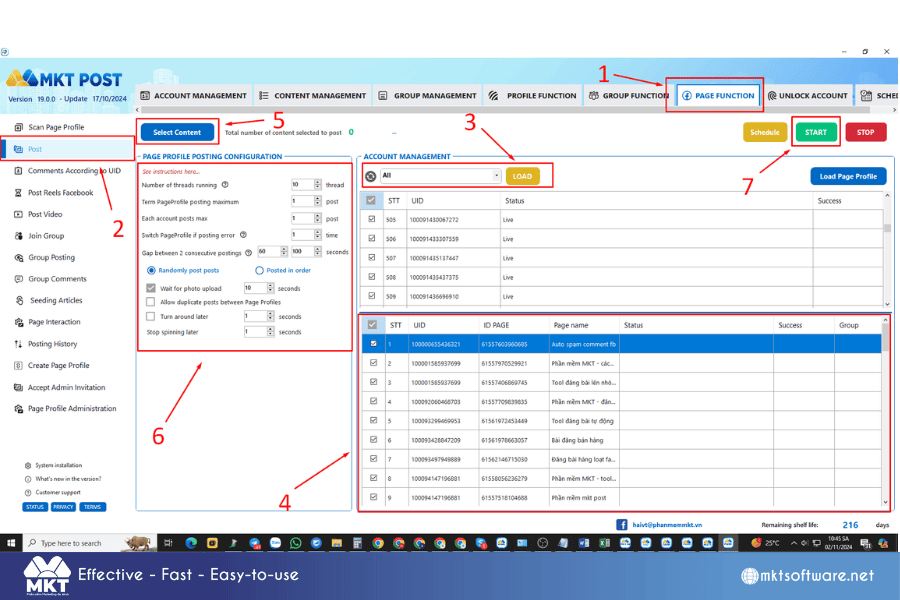
Step 1: Log into the MKT Post Software
- Access the MKT Post software and log into your account.
- Once logged in, you’ll be taken to the main dashboard.
Step 2: Connect Your Faceboo k Account and Page
- On the main dashboard, select Add Facebook Account and follow the prompts to grant access.
- After successfully connecting, the system will display a list of Pages you manage.
- Choose the Page on which you want to auto-post.
Step 3: Create Your Post Content
- In the Post on Page section, select Create New Post.
- Enter your post content, including text, images, videos, or links as needed.
- Use the content spinning option if available, to generate different variations of your post to avoid duplication.
II. Comments according to UID
Step-by-Step guide for using the comments according to UID feature in MKT Post
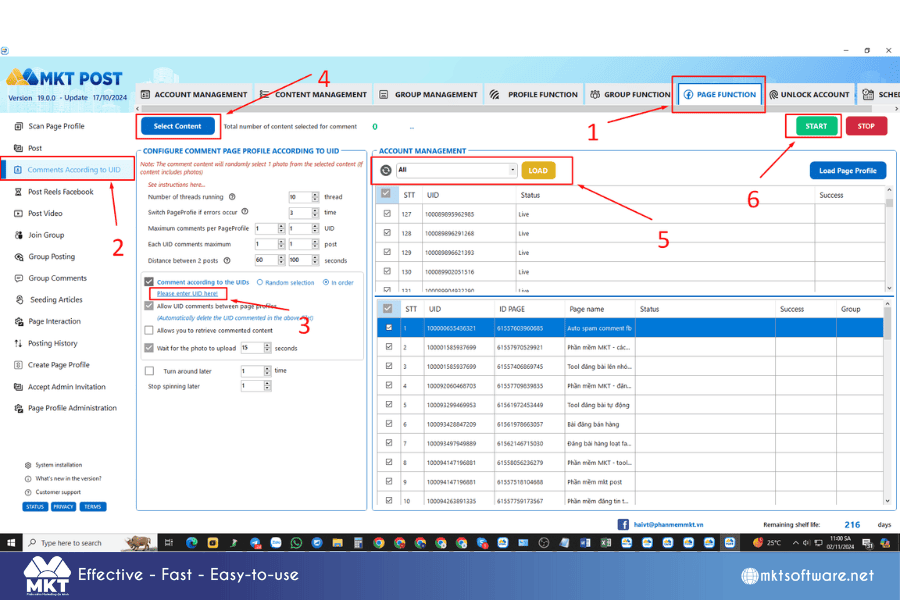
Step 1: Prepare the List of UIDs
- Gather the list of User IDs (UIDs) of the Facebook users you want to target. These UIDs can be from followers, potential customers, or people who have engaged with your posts.
- If you don’t have UIDs yet, use MKT Post’s UID extraction tool to retrieve them from groups, pages, or posts based on your audience.
Step 2: Navigate to the Comments According to UID Feature
- On the MKT Post dashboard, locate and select Comments According to UID.
- This feature allows you to automatically leave comments on posts related to specific UIDs, helping you increase engagement and build connections with targeted users.
Step 3: Compose Your Comments
- In the comments section, write the messages you want to post.
- Use the content spinning option to create multiple variations of your comments, making each one unique to avoid appearing spammy.
Step 4: Upload the UID List
- Upload your list of UIDs by either pasting them manually or importing a file.
- MKT Post will match these UIDs with the corresponding users’ posts, allowing your comments to be placed in the right contexts.
Step 5: Set Up Commenting Preferences
- Adjust settings like timing and frequency of comments to ensure they appear naturally and avoid spam detection.
- Choose random time intervals between comments if needed to mimic natural engagement patterns.
Step 6: Launch the Commenting Campaign
- Review your settings and click Start to begin the commenting process.
- MKT Post will automatically post your comments according to the UID list, engaging with each user effectively.
III. Scan Page profile
Step-by-Step guide for using the scan Page profile feature in MKT Post
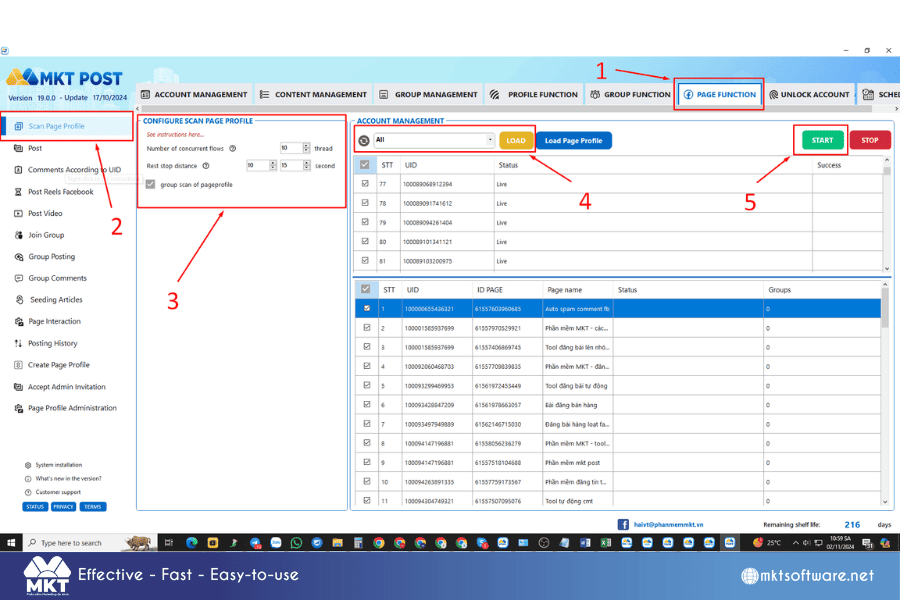
Step 1: Navigate to the Scan Page Profile Feature
- On the MKT Post dashboard, locate and select the Scan Page Profile option.
- This feature allows you to gather detailed data about a specific Facebook Page’s followers, posts, and engagement.
Step 2: Enter the Target Page Information
- In the Scan Page Profile section, enter the URL or Page ID of the Facebook Page you want to scan.
- Ensure the Page is public and accessible, as private or restricted Pages may not provide full data.
Step 3: Configure the Scanning Options
- Set up the scanning parameters, such as the type of data you want to retrieve (e.g., posts, likes, comments, follower details).
- You can also choose to scan posts within a specific timeframe if you’re interested in recent data or trends.
Step 4: Start the Scanning Process
- After configuring your settings, click Start Scan.
- MKT Post will begin scanning the selected Page profile, gathering information according to your specified parameters.
- This process may take a few moments, depending on the amount of data available on the Page.
IV. Conclusion
In conclusion, learning how to use the Page function on MKT Post gives marketers a powerful tool to streamline and optimize their Facebook marketing efforts. By automating posts, managing engagement, and gaining insights through detailed analytics, MKT Post enables you to reach and connect with your audience effectively. This comprehensive tool simplifies content management across Pages, saving time and maximizing reach with minimal effort.
Contact us:


